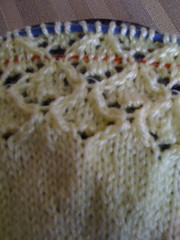
Well the lace work continues... I now have 2.5 repeats of 4. On my Cherry Blossom Baby Sweater. I tried the Dental floss lifeline trick, however It can be a little time consuming.
Dental Floss Lifeline procedure:
- Thread a needle with floss
- work the needle through all active stitches and yarn overs on the row
- Continue knitting
- Heaven forbid you have to use it, now you have to rip back to the floss row
- Carefully work your needle back through the stitches on the floss.
- Begin again...
I thought about this process and came up with another way using a spare circular needle. For this project I used a size 2 40" circular needle as my lifeline.
Circular Needle Lifeline:
- work the circular through the active stitches underneath the cable of your project needle.
- Continue knitting (this is a little awkward with the cable left in on the previous row)
- Now if frogging is necessary rip back to the cable/ lifeline
- Begin again using your lifeline needle to knit off of.
This method works well because it eliminates a few steps. You don't have to worry about the size difference of the needles because the stitch size is determined by the right hand needle not the left.
 My circular lifeline can be seen above (the red cable) holding my place just in case...

5 comments:
I think I will actually use a lifeline from now on. Great idea.
Thanks.
I love your idea. Thanks for sharing. I WILL use a lifeline next time...
Thanks! I am glad it helped someone else. :D
Thank you for the lifeline idea. I'm a new knitter and especially to lace, and I was wondering how to do a lifeline with the yarn overs. Thanks again.
I must be dense or something. I went to many sites, even went to Youtube and still couldn't figure out how to do a lifeline. Should have asked a fellow country girl. Your desciption made perfect sense. I knitted a sweater and I must have frogged it 20 times at least. Lifeline would have really come in handy. I'm ready for next time. Thanks
Post a Comment